CLOSE
Python virtualenvironments virtualenv testautomation testframeworks robotframework Before we can create a virtual Python environment, we will have to take a few preparatory steps:
Please note that the instructions have been written with Windows in mind (in my case Win 10 Pro). But the whole process is very similar on Linux/Unix.
Here we go … .
We might have a need to develop, run and test our project code against multiple Python versions, because our project is simply required to support multiple versions. Or maybe our project libraries directly or indirectly depend on a specific Python (library) version that other projects do not support.
When any such situation is applicable, install the required Python versions. These Python system installations will then serve as the basis for the various virtual environments that we will create.
For our purposes, we need to install Python versions that are above Python 3.3. Anything below that, can (and will) entail problems later on.
For the sake of this post, I have installed the following versions:

I will not elaborate much on the Python installation process itself, since it is pretty straightforward and since you can easily find the answer to any question (and the solution to any problem) you might have on the web.
However, please make sure to add (at least) one Python installation to your operating system’s PATH. The installer can do this for you. Just tick the corresponding check box within the installer dialog.
Also make sure to activate the option to install the ‘Python Launcher’. Again, the installer can do this for you if you tick the relevant check box. Preferably install it with the highest of your chosen Python versions.
As was just mentioned, we need to have the Python root (= installation) folder as well as the \Scripts sub-folder on the PATH environment variable of your operating system. In my case, I put the following on the PATH:
C:\Python39C:\Python39\ScriptsThe installer will have done this for you, if you had ticked the corresponding check box. If the latter is not the case, you will now have to perform this action manually. If you do not know how to do the latter, please query a web search engine:
modify path variable [your_os].
Note that for our purposes, it will be sufficient to take this step for just one of multiple Python versions. In our case it is also irrelevant which one that is.
Reversely, having the folders of multiple (or even all) Python versions added to PATH won’t hurt either. This is because it is always the first occurrence (of the folder pair) that is found in PATH, that will be used by the OS or applications that look for Python. Possible other entries are then simply ignored. The first occurrence on PATH is usually (but not necessarily) the folder pair of the Python version that was installed last. However, for our purposes none of that matters anyway, as we will see later on. Just have the mentioned two folders added to PATH for at least one Python version.
To check whether a Python version has been properly installed, you can perform a simple test: immediately after an installation, open a command line and type:
python -V
That will always output the version of the Python installation whose root and \Scripts folders are the first on the operating system’s PATH variable. Typically (but not necessarily) that will be the Python installation that was installed most recently.
To be able to see the versions of all the Python installations on your system, you must use another approach. This one assumes that you have installed the 'Python launcher' (as described earlier). In case you have, open a command line after you have installed all of the required Python versions and type:
py -0
This will output all installed Python versions on your system:
C:\Users\Michael Hallik>py -0
Installed Pythons found by py Launcher for Windows
-3.9-64 *
-3.8-64
-3.7-64
The asterisk indicates which Python version the Python launcher will use by default (always the most recent version of Python it can find). By the way, it does not indicate which Python version is first in PATH. This could be the same version. But it is by no means necessarily so.
Tip: if you issue the command py -0p (so with an added ‘p’) then the output will also include the paths to the various Python installations.
As there are many tools available for creating and managing virtual Python environments, we will first have to select one.
As was just said, there are quite a few candidates.
For instance:
venv module, that comes shipped with Python (i.e., is part of the standard library).virtualenv module.pipenv module.anaconda module.I will not go into the differences in capabilities nor into the specific comparative pro’s and con’s of these, as there is a plethora of online posts on these topics. For instance this one or this one.
Here we will simply choose virtualenv, as most or all of the other candidates either are (too) simplistic (e.g. venv) or boast way too much other functionality (e.g. pipenv and anaconda).
Moreover, virtualenv comes accompanied with a module named virtualenvwrapper-win that, as it’s name suggests, serves as a wrapper to virtualenv. This wrapper provides us with all kinds of convenience functions that will greatly enhance the efficiency of our environment management activities.
Also, virtualenv is a very popular tool and you will therefore find lot’s of on-line information for it.
Finally, IDE’s such as PyCharm and Visual Studio Code can (re-) use virtual environments that have been created through virtualenv. This adds a lot of power and flexibility to these editors. Especially, since the virtual environment capabilities that an editor such as PyCharm provides us with natively, are rather limited.
For this step you must have modified your PATH environment variable in accordance with what has been said earlier.
Assuming you have followed all of the previous instructions, you will now have pip available. This is one of the most popular Python package managers and for that very reason it also comes shipped with Python. With pip you can install external, third-party Python packages. That is, packages that are not part of Python’s standard library. Additionally, pip makes it very easy for developers to manage any external dependencies of the various modules in the packages they distribute. As a matter of fact, we will use that feature of pip to be able to restore and also share our environments later on.
To see whether you have pip available, open a command line and type:
pip -V
In case pip is not available, check whether you have (the correct version of) Python available. Just type:
python -V
in your console/shell/CLI.
In case your CLI doesn’t recognize the issued command, check your PATH environment variable (in accordance with what was said earlier).
If the command is executed, but the returned Python version is below 3.4, then pip will not be included in the standard library and you’ll have to install it manually for that Python version. Or put a suitable Python version as first on your PATH (assuming one is installed).
To install, simply open a command line and type:
pip install virtualenvwrapper-win
Since virtualenvwrapper-win is a wrapper for virtualenv and, as such, reuses and depends on it, the latter will also be installed:
C:\Users\Michael Hallik>pip install virtualenvwrapper-win
Collecting virtualenvwrapper-win
Collecting virtualenv
Using legacy 'setup.py install' for virtualenvwrapper-win, since package 'wheel' is not installed.
Installing collected packages: virtualenv, virtualenvwrapper-win
Running setup.py install for virtualenvwrapper-win ... done
Successfully installed virtualenv-20.4.0 virtualenvwrapper-win-1.2.6
So, what we did just now is equivalent to:
pip install virtualenv
pip install virtualenvwrapper-win
Note that, depending on your specific set-up, one or more other dependencies (such as appdirs, filelock, six, distlib) may have been installed and visible in your command line output.
This step is optional, but definitely recommended.
We can set a default target (i.e. home) directory for our environments. That way, we will not have to specify a target directory every time we create a new environment. Similarly, we will not have to specify that directory whenever we activate an environment (activation will be explained in the next article).
We set a default directory by creating a user environment variable. I have chosen the following directory myself:
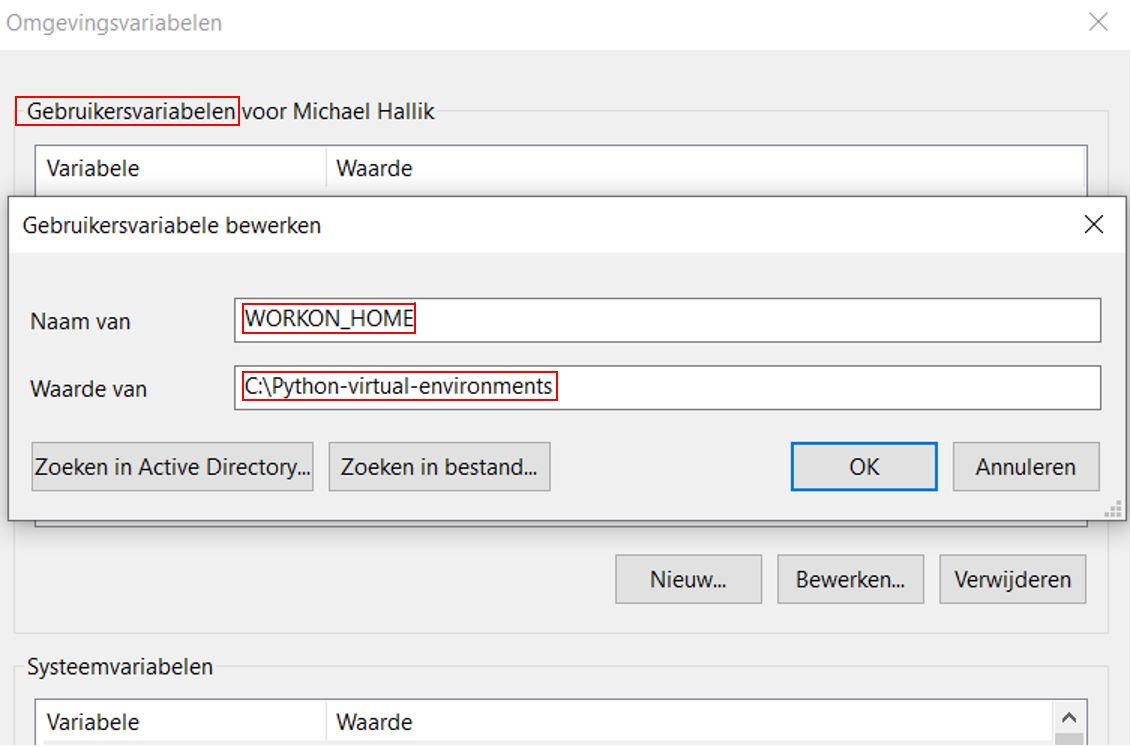
If you do not know how to create such a variable, please query a web search engine:
add environment variable [your_os].
Well, that was it! We have taken all required preliminary steps and are now (finally) ready to actually create our very first virtual environment.
Comments
Please join the discussion: place a comment on this page.
The comment will be immediately visible in this comment section.
Please note a Github account is required to comment.