CLOSE
testautomation testframeworks robotframework soaplibrary services web-services API SOAP authentication SSL TLS certificates openSSL In this day and age test automation engineers mostly design and code Graphical User Interface tests to execute them in a web browser. However, more and more teams are moving towards test automation at the service-level, automating against some sort of API.
When we join such teams we will mostly encounter web services, generally ones that are based on SOAP or REST.
A service-level test automation interface, such as SOAP or REST, poses challenges that are often (though not always) quite different from those we encounter when testing against a web GUI. In this post (possibly the first in a series), I want to address one such challenge (or problem) that I came across in the field: client authentication by means of a TLS client certificate.
One of my assignments involved testing a variety of SOAP and REST services. We were using mainly Robot Framework, but also Postman and SoapUI to create test suites for those services. In one of the sprints I had to create an automated test suite for the purpose of validating a specific SOAP service.
Without going into the reasons for doing so, I chose Robot Framework for the job.
Since I had to automate against a SOAP service, I decided to give the new SoapLibrary a try. That library is based on the zeep SOAP client, which appears to be a highly future-proof Python module.
The first step was to create a Robot Framework test suite file for a preliminary, quick exploration of the SOAP service. The latter required the instantiation of a SOAP client, passing it (at least) the WSDL (URL):
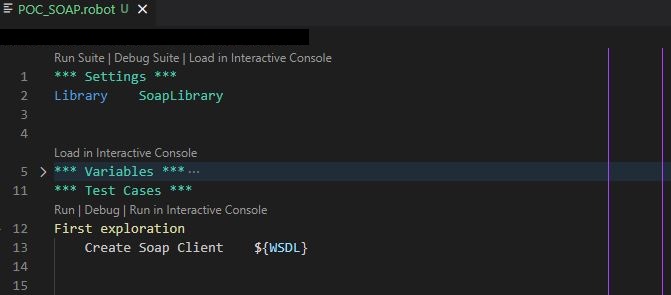
Of course something is missing here, as your average SOAP service requires some form of client authentication.
Now, in the past I had worked with SOAP services where client authentication occurred at the transport level (e.g. through application of the HTTP ‘Basic’ authentication scheme) and at the application (that is: message) level (through token-based authentication in accordance with the WS-Security specification).
This specific service, however, required authentication by means of a TLS client certificate.
TLS is the successor of SSL and is what enables HTTPS (HTTP-Secure).
To this end, TLS resides between HTTP and TCP in the Internet Protocol Suite. Logically it inhabits the application layer. Certificates are an integral part of TLS, but there is much more to it. For instance, it also involves the topics of (cryptographic) hashing, (symmetric and asymmetric) encryption, digital signatures, Public Key Infrastructure, et alia. All of this lies outside the scope of this article.
For now all you need to know is that, very broadly speaking, TLS certificates are used to verify the certificate owner’s identity. Usually the server’s identity, but sometimes also the client’s (as was the case here). This method can be applied on top of or instead of other verification approaches and measures. For instance, on top of HTTP Basic Auth or as an alternative to it.[1]
In my case, it was the latter: I only needed a client cert and nothing besides.
It actually took me a while, but at some point I managed to acquire a valid client certificate. It came in the form of a so-called ‘PKCS#12’ (aka ‘PKCS12’ or ‘PFX’) file.
PKCS#12 is a standardized format for a type of archive file that specifically holds one or more cryptographic objects. It is part of the PKCS family of formats, where ‘PKCS’ stands for ‘Public Key Cryptography Standards’.
A PKCS#12 file has either a .pfx extension or a .p12 extension. Usually the latter, since the PFX format (and the corresponding .pfx extension) is actually just a precursor of the more recent PKCS12 (with it’s .p12 extension). That is, PKCS#12 evolved out of PFX.
The certificate file that I received was, indeed, a .p12 file: bogus.name.p12.
Now, PKCS#12 has been developed to facilitate the secure and confidential distribution of certificates to trusted parties that need to be authorized to use one or more secured services. Specifically, it is used to export/import existing certificates for the purpose of transporting them from one platform, system or tool to another.[2]
To this end, a PKCS#12 file can hold the following types of cryptographic objects: a private key, a certificate and/or a certificate trust chain. Technically a PKCS#12 file can contain any (number) of these objects. Typically though it holds either the combination of a private key and the related certificate or the combination of a private key and the related certificate chain.
And indeed: my PKCS (.p12) file contained a certificate chain and a private key.
But why would I need the latter?
As was said before, I don’t want to dilate upon TLS and all of it’s moving parts. Therefore, let me just say that a private key is instrumental in the process by which the server establishes that the certificate itself is indeed bound (i.e. belongs) to a specific client. This happens during the client authorization part of the TLS handshake between client and server. Note, however, that merely the certificate will be provided to the server. The private key needs to stay with the client at all times: it’s exclusivity is essential within the world of asymmetric encryption and, thus, TLS. The server will only have access to the client’s public key, which is embedded in the client’s certificate.[3]
Since a PKCS#12 file is typically used for the transportation of a certificate and the corresponding private key, security is imperative. That is why the public key is 3DES encrypted and the file is password protected accordingly.
Naturally, all of this applied to my specific .p12 file as well.
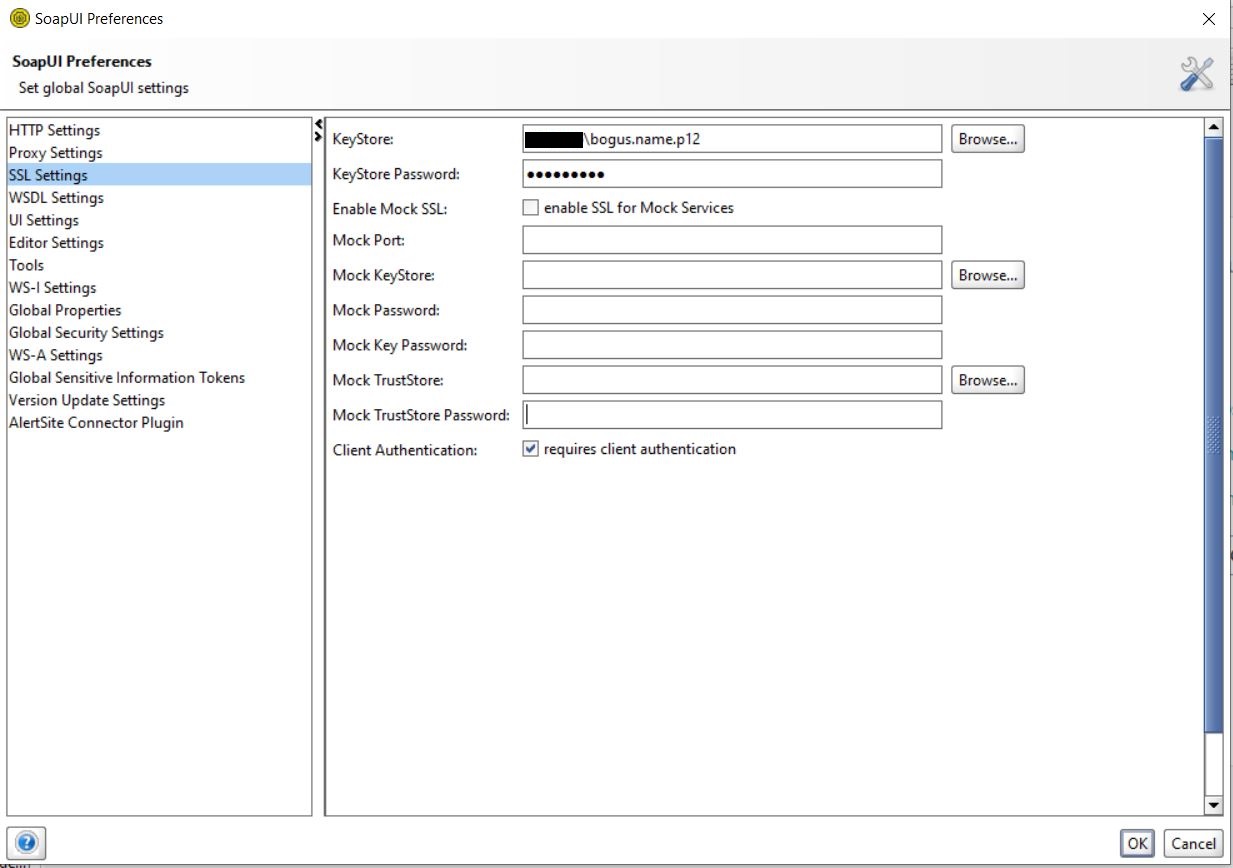
When using a tool such as SoapUi, typically you can simply import a client certificate into your SOAP project. For instance through importing a .p12 file, like this:
Unfortunately, I soon found out that the RF SoapLibrary did not support the importing of a client certificate. Rather, the ‘Create Soap Client’ keyword merely facilitated HTTP Basic Auth.[4]
Therefore I created an issue on the library’s project pages. Fortunately, the maintainers of the library added the feature within a very short span of time!
As soon as the new version was released, I did a:
pip install --upgrade robotframework-soaplibrary
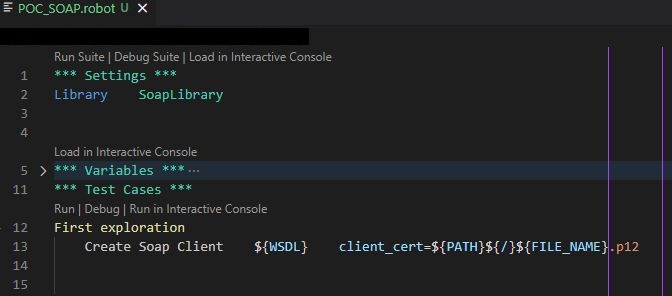
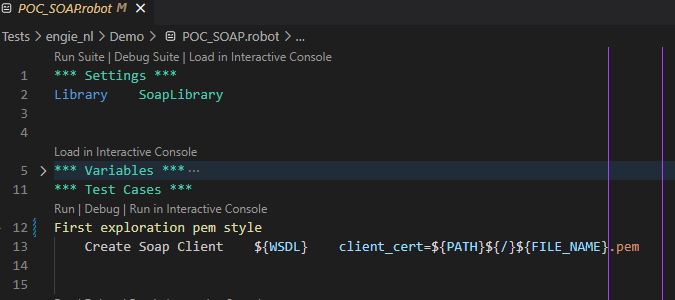
and subsequently added the path to my certificate (.p12) file as a value to the (brand new) ‘client_Cert’ argument of the ‘Create SOAP Client’ keyword:
To my disappointment, running this only resulted in the following error message:

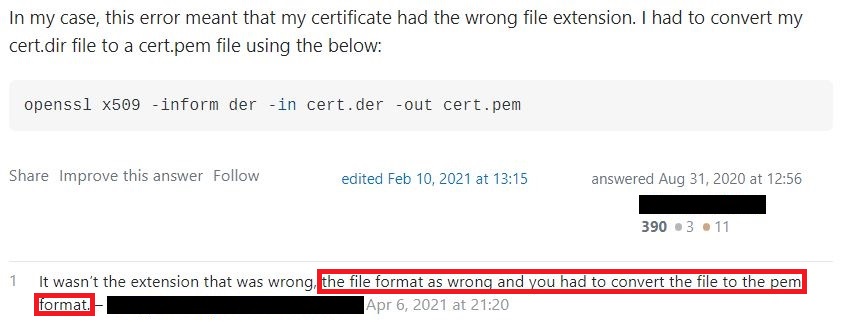
I searched the web for ‘ssl error 9 pem lib’ and found a relevant question on stackoverflow on the very top of my search results.
Among the multiple answers to that question, I soon found one that looked to me like the most probable solution to my problem:
What exactly does that mean?
Well, foremost it means that I’m a bit slow. Or lazy. Or impatient. Or all of these.😏
Because, if I would have taken the enormous effort of reading the keyword documentation for the ‘Create SOAP Client’ keyword after the release of the new SoapLibrary version, I would have seen this:
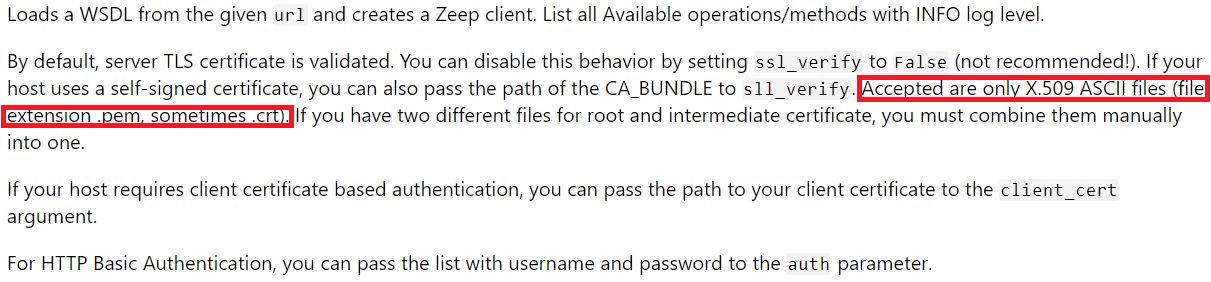
As can be gathered, a certificate file needs to be provided in the form of a .pem or .crt file. These file extensions signify files that hold cryptographic objects and that adhere to the PEM format. PEM is an alternative to the PKCS#12 format. Contrary to the latter, PEM is not binary but text-based (BASE-64 encoded). Moreover, it can hold additional types of cryptographic objects (such as raw public keys), which a PKCS#12 file cannot. See also the remarks in footnote 2.
But all I had was a .p12 file. … So now what?!
Upon researching a solution to my problem, I soon came across what is probably the most versatile (and, consequently, also the most used) SSL/TLS tool: OpenSSL.
OpenSSL is a set of libraries and command-line tools that can be used for the most diverse of SSL/TLS related tasks. For instance: creating certificate signing requests, installing certificates, creating private keys, inspecting the contents of any type of certificate file and so forth.
What it also can do, is convert certificate file formats!
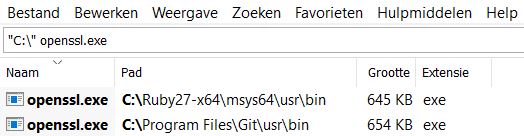
OpenSSL is shipped with lot’s of operating systems and also integrated into (or shipped with) many tools. One tool that comes with OpenSSL is Git. Therefore, since I had Git installed, I did not have to bother with selecting and installing a third-party OpenSSL distribution for Windows. OpenSSL can be found in the following sub-folder of the Git root folder:
usr\bin
And if, as another example, you have Ruby installed on your system, then you have OpenSSL as well:
There are a lot of resources on the web that describe the many features and functions of OpenSSL and lay out the corresponding commands. Since I had a .p12 PKCS file, the one relevant command for me was the pksc12 command. This command can create as well as parse (read) .p12 certificate files. To that end the command comes with a plethora of options.
For instance, the following command allows one to inspect the contents of a .p12 file:
openssl pkcs12 -info -in bogus.name.p12
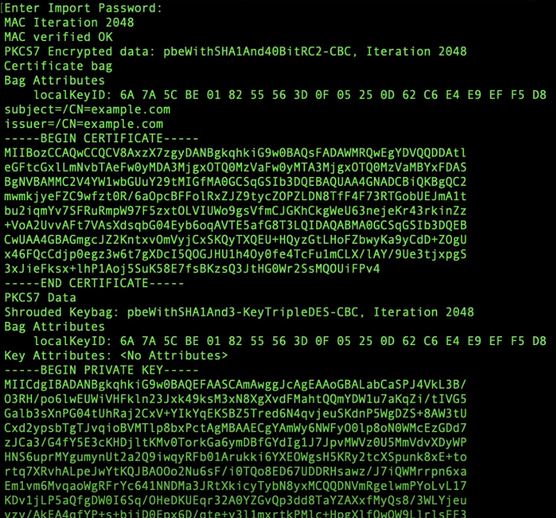
As my certificate file was password protected, I was prompted for the password after submitting that command:

This will generate an output that will look similar to this:
The next step was to find the exact command that was needed to convert the .p12 file to a PEM formatted file. Because of the aforementioned copious amount of online resources on OpenSSL, it took merely a few moments to find it:
openssl pkcs12 -in bogus.name.p12 -out bogus.name.pem -nodes
This command is pretty self-explanatory, as was the previous one. The only noteworthy option here is -nodes (read: no-des), which prevents the private key from being encrypted and password protected within the PEM target file.
Since the Robot Framework SoapLibrary does not (yet) support encrypted, password protected private keys, we need to drop this protection.
Please note that this obviously entails a nontrivial security risk! So, not only should you make sure to have formal permission for this action, but also to take risk mitigating measures. For instance, you might employ the Robot Framework CryptoLibrary.
Upon submitting the command, I was again prompted for the password. After having provided it, the command executed successfully:

Pretty unspectacular, huh? … But nevertheless effective:

I now had an additional certificate file in PEM format.
So, all that was left to do was modifying the test code so as to pass the correct file image path to the ‘Create SOAP client’ keyword:
Running the new code resulted in a successful test run:
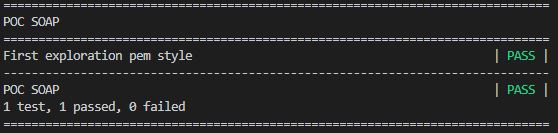
Additionally, in the log entry for the ‘Create SOAP Client’ keyword, the available SOAP methods were now revealed:

Thus, I could now finally start my preliminary exploration of the service under test.
That was actually pretty easy.
The steps to take were only a few and not too complicated. Because I chose to elaborate on a couple of subjects, the whole process might look somewhat cumbersome. But it really isn’t:
In conclusion, if you want (or need) to utilize the Robot Framework SoapLibrary and have a non-PEM certificate file, you can very easily employ OpenSSL to convert it to the required PEM format.
Because of the extraordinary versatility of OpenSSL, you will most likely find a solution to virtually any problem that you may encounter with regard to client certificates.
[1] Using a client certificate on top of HTTP Basic Auth would establish two-factor authentication (something the client has and something the client knows). (back)
[2] There exists a variety of similar, alternative (container) formats, that have all been developed for the purpose of packaging and distributing certificates and/or related cryptographic objects. For instance: PEM, PKCS7 and DER.
Without going into details, these formats differ in various respects such as: being binary or non-binary; the encoding used (e.g. base-64 or ASCII); the types of cryptographic objects they can hold; the platforms that use them (e.g. Windows/IIS, Java/Tomcat); whether or not they are encrypt-able; etc.
Each format thus has its own, specific use cases. For instance, the PKCS#12 format is mainly used to export & import certificates (and the corresponding private keys) on Windows systems.
Finally, each format is associated with one or more file extensions. For instance: .csr, .pem, .der, .key, .cert/cer/crt, etc. (back)
[3] A private key is part of a (so-called) 'key pair'. The other key in this pair is the (so-called) 'public key'. A public key can be freely distributed (hence 'public'), while a private key is always in the sole possession of one party (hence 'private').
In asymmetric encryption, one key is (exclusively) used to encrypt, while the other is (exclusively) used to decrypt. Which key does what depends on the type of encryption algorithm that is employed. For instance, with a so-called 'key exchange algorithm', the public key encrypts and the private key decrypts. With a 'digital signing' algorithm, the roles are reversed. Consequently, since the private key is always in the hands of exactly one party, either the capability to encrypt or the capability to decrypt is always limited to that one party.
The keys from a pair have a unique mathematical relation, since the public key is mathematically derived from the private key (which is always created first). In that sense the keys are intrinsically geared towards each other. That is why (for instance in a key exchange) the private key can only decrypt messages that have been encrypted with the public key from that specific pair. It can't decrypt message that have been encrypted with a public key that has been taken from some other pair.
A certificate contains the owner's (i.e. a server's or client's) public key (alongside some other (meta-) information. So when the client would digitally sign a piece of data with its private key and send it to the server, then the server could use the client's public key to decrypt that message (provided the server has the client certificate in it's possession). Without going into the exact (and manifold) details, it is precisely this circumstance that can be used in verifying the client certificate's authenticity. (back)
[4] The old Robot Framework SOAP testing library (the 'SudsLibrary') did not support client certificates either. Generally, the lack of support for a broader range of authentication schemes and technologies is often a disadvantage when using open source test tooling. Commercial tools often support the full range of common (and sometimes even more 'exotic') authentication schemes and strategies. (back)
Comments
Please join the discussion: place a comment on this page.
The comment will be immediately visible in this comment section.
Please note a Github account is required to comment.