CLOSE
testautomation testframeworks encryption test-data robotframework RF_testlibraries CryptoLibrary A lot has been written on test data management. One of the topics that may be of particular interest is that of protecting and securing test data.
When we are testing it may be necessary to obscure, obfuscate or ‘mask’ sensitive data. Maybe especially so when automating tests. Not only is the test code and data oftentimes worked on by (and thus shared between) many contributors, but sensitive data may also be shown in the console (during test execution) and/or be printed out in log files that may be available to even more people.
In this post I will not go into the various types of sensitive data that you may encounter. Nor into the many possible reasons why you may want to protect that data. I will also not elaborate on the many techniques and tools that exist for doing so, such as variance, shuffling, encryption, scrambling, etc. There are lot’s of existing blog posts and various other resources on all of these topics.
Here I simply want to introduce a really great test library that I started using recently: the Robot Framework CryptoLibrary. The post is merely meant to get you up to speed with this library, without delving too deep into the concepts surrounding the complex topic of cryptography.
To this end, we will be going through the following steps:
As the name suggests, the CryptoLibrary has been designed to encrypt and decrypt confidential data. Thus, using this library, we can protect sensitive test data, whether it be data in external data sources or data contained within the test code itself (inline). It also enables us to mask data that would otherwise be visible in the console output and in log and other output files. The data that is thus secured could be anything: user id’s, passwords, e-mail addresses, credit card or bank account numbers or address data such as street names or zip codes.
To this end the CryptoLibrary uses asymmetric (elliptic curve) cryptography. Again, I won’t go into details regarding this technology. For now, you only need to know that asymmetric encryption is centered around the concept of a ‘key pair’. It does not use one and the same key to encrypt and decrypt. Hence ‘asymmetric’. Rather, it uses a so-called ‘public key’ to encrypt all of the relevant pieces of data and a so-called ‘private key’ to decrypt those pieces of data.
We can use the CryptoLibrary to generate such a key pair.
The public key is then made available to anyone or anything that needs to encrypt data. In our case, that’s us: the testers.
Key (😉) here is that the private key from our pair is the only key in the world that can decrypt data that has been encrypted with the public key from that pair. The private key is used exclusively by the CryptoLibrary. So, contrary to the public key, the private key is not being issued to anyone or anything else: only the CryptoLibrary can decrypt data and has, therefore, access to that key. Note further that the private key can only decrypt data that has been encrypted with this specific public key. In other words, the private key cannot decrypt data that has been encrypted with a public key that came from another key pair. The keys from a pair are intrinsically geared towards each other and thus only function when used in conjunction with each other.
Finally, please note that encrypted data is called ‘ciphertext’, while unencrypted/decrypted data is called ‘plaintext’.
The CryptoLibrary requires Python 3.6 or higher.
We can install it using pip:
pip install robotframework-crypto
Of course, we also need to import the library. However, we will do so at a later moment.
First, we will need to complete a few other steps.
The CryptoLibrary comes with a set of command line (CLI) tools:
1) The ‘CryptoLibrary’ tool.
Don’t get confused. Our test library is named ‘CryptoLibrary’. But the library comes with a CLI tool that is also called ‘CryptoLibrary’.
We can use this CLI tool to create a public/private key pair, amongst other things.
2) The ‘CryptoClient’ tool.
We can use this tool to encrypt our test data using the generated public key. As explained before, this encrypted data can subsequently only be decrypted with the unique, corresponding private key that is part of the generated key pair.
Since we need a public/private key pair to encrypt and decrypt, we will first have to generate such a pair.
Open up a terminal (e.g. the command prompt or power shell on a Windows system) and enter the command ‘CryptoLibrary’. In the screen shots that will follow, you will notice that I am using a virtual Python environment. So, my prompt may look different than the one you’re using. If you see:
'CryptoLibrary' is not recognized as an internal or external command, operable program or batch file.
there could be several underlying reasons. Most probably you failed to add the ‘Scripts’ folder (as located in the Python root folder) to your PATH environment variable. Please use your search engine skills to solve this little problem.
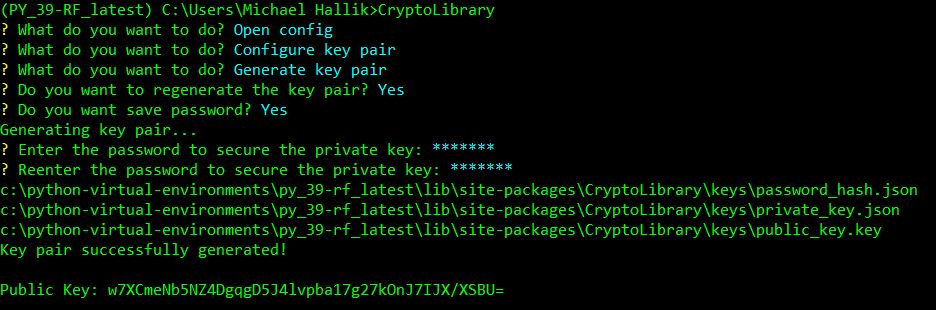
After having entered the ‘CryptoLibrary’ command, we’ll be presented with a menu:

As you can see there are four initial menu items. ‘Encrypt’ is the currently selected item.
I will not guide you through all of the menu items and their sub-menu’s. Please see here, for an overview of all available menu items.
Since we want to create a key pair, we activate the menu item ‘Open config’ (using the arrow-down and enter keys). This will bring us to the following sub-menu:
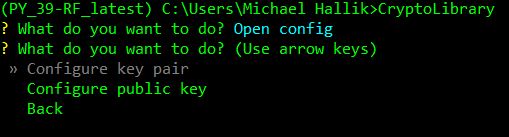
Activate menu-item ‘Configure key pair’. This will then provide us with the following menu:
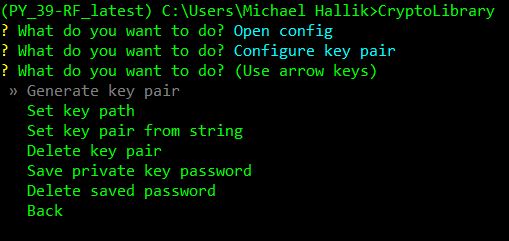
Select the menu item ‘Generate key pair’. That will present us with a question:
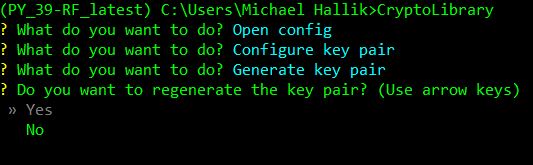
This question should actually only come up if we had an existing key pair. However, due to a bug this question currently always comes up, so regardless whether we have or have not an existing key pair. Now, if we had an existing key pair, then choosing ‘No’ would amount to aborting the creation of a new key pair. And choosing ‘Yes’ would delete the existing pair and then create a new pair (hence ‘regenerate’).
Please note that I have contacted the author of the library. He assured me he would soon fix this little bug.[1]
Having said that, we can simply choose ‘Yes’ in order for our key pair to be created.
But … first we are asked if we want to save the password to disk. The password in question is meant to protect the private key of the key pair that is about to be generated. We need that private key to be protected, since it is capable of decrypting our encrypted test data. Therefore, we do not want unauthorized usage of the private key! A password helps in preventing such usage.[2]
Creating a password for the private key is mandatory. What we are being asked here is whether we would like to save that password to disk. If we answer ‘Yes’, two things will happen: the password we will specify will be secured through hashing and that hashed password will then be saved to disk. If we choose ‘No’, then the password will not be saved to disk and not be hashed. A third effect of not saving the password to disk, is that we will have to specify the (unhashed!) password as an argument when importing the library later on (as we’ll see further on). So, choosing ‘No’ severely decreases the level of security we apply to our private key!
Therefore, let’s select ‘Yes’. That way our password will be secured, we won’t have to remember it and we won’t have to specify it later on as an argument in our test code. Rather, the CryptoLibrary will search for a password file in the designated folder and, when found, will extract the password from that file. More details on this in the remainder of this article.
Two things will happen now: a key pair will be generated (and saved to disk) in the background and, subsequently, we will be prompted to provide the password:
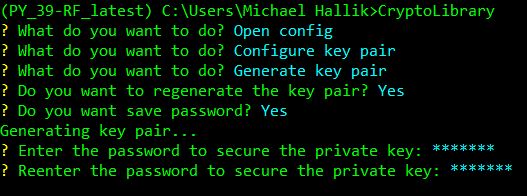
Let’s enter our password (twice) and press ‘enter’. This will hash the specified password and then write the result to a text file on disk.
So, two keys and a password have now been generated and written to disk. Therefore, the console additionally prints the path’s to:
Finally, the public key itself is also printed to the console.
Our console will therefore now look something like this:
Of course, the printed public key is identical to the key that is contained in the public_key.key file. As explained earlier, we will later use that public key to encrypt our test data. Note, however, that you do not need to copy the public key from the console window. It is printed merely for informative purposes. Further down, we will see how the public key is retrieved and employed when we encrypt data.
Also note that, were we to repeat the steps to create a key pair, the current key pair (and password file) would be overwritten! So if, for whatever reason, you need a second pair, you will first have to move the current pair to another folder. We’ll talk later about the reason why you may want to do so.
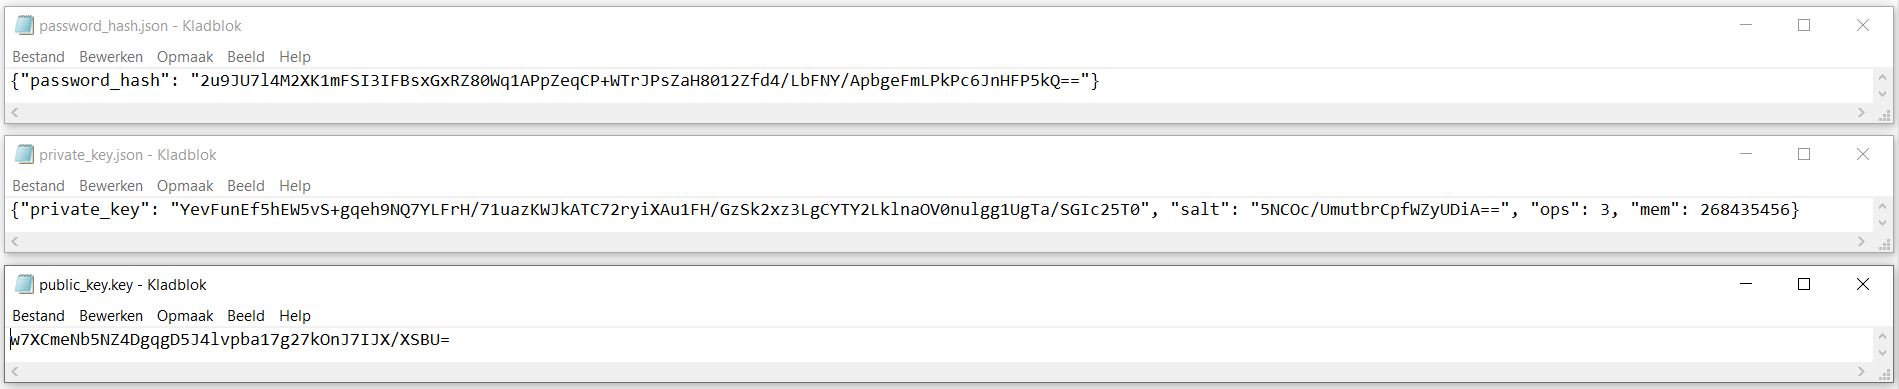
The private and public keys as well as a password have now been saved to our file system, in the form of three files:

As we saw in the last screen shot of our console output, the three generated files are located in:
your_Python_root_folder\Lib\site-packages\CryptoLibrary\keys
This is the default folder that the keys (and password) are saved in and (at later stages) will also be retrieved from.
As one might expect, the default folder can be changed. This can be done through the [Open config -> Set key path] menu option of the ‘CryptoLibrary’ CLI tool, as could be gathered from the earlier screen shot.
The contents of the files looks something like this (click the picture to enlarge):
Now that we have our key pair, we are ready to encrypt test data using the public key.
To encrypt test data we will utilize the second CLI tool that comes with the library: the CryptoClient.
Make sure you have a terminal window open and then enter the command ‘CryptoClient’:
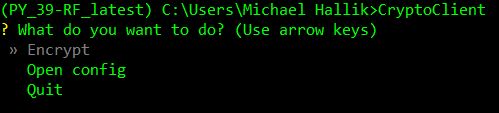
Again, I will not elaborate on all of the available menu options. To familiarize yourself with all options, please read the relevant section on the lib’s project page.
Here we merely want to encrypt a piece of test data. To this end, choose menu item: ‘Encrypt’.
We are then prompted for the test data that we want to encrypt. Note that the prompt specifically states ‘password’. However, as mentioned before, we can encrypt any type of test data and not just passwords:

Encryption will only work if we have a public key. Luckily we do, since we had generated a key pair in the previous step. The public key from that pair will be used to encrypt our data, employing one of the cryptographic schemes of elliptic curve cryptography.
The CryptoClient will automatically search for the public key in the designated folder. That is, it will look in the default folder (your_Python_root_folder\Lib\site-packages\CryptoLibrary\keys). Unless you have set a different folder through the ‘Set key path’ menu option of the CryptoLibrary CLI tool (as described earlier): in that case, it will look in the folder you have configured.
That means that we do not have to manually supply (or point to) a public key, but can simply provide the test data to encrypt and press ‘enter’. This will then encrypt the data and subsequently print it out in the console window:
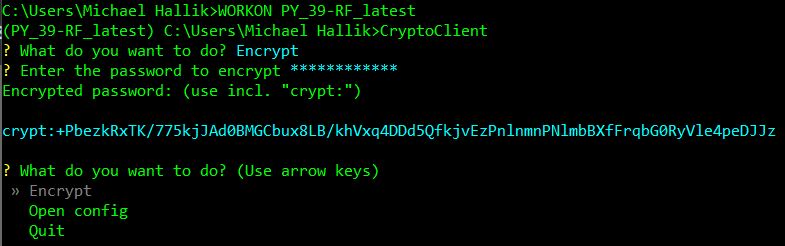
Here I have encrypted a password for the demo site https://www.saucedemo.com/. The password I have encrypted is ‘secret_sauce’.
Note that an instruction is printed as well: use incl. "crypt:". The reason for this instruction will become apparent later on.
Copy the ciphertext (including the ‘crypt:’ prefix) from the console window. We will need it in the next step.
We will now use the obtained ciphertext as our test data.
To this end, we must somehow enable Robot Framework to decrypt that ciphertext. Surely, when we enter the password into the relevant edit field of the saucedemo site, we do not want the encrypted data submitted. We want the original, plaintext version of the password.
Therefore we will now import the CryptoLibrary.
I am assuming you have a runnable test suite file set up. If not, please create one.
Then, within your Settings declaration, import the CryptoLibrary as follows:
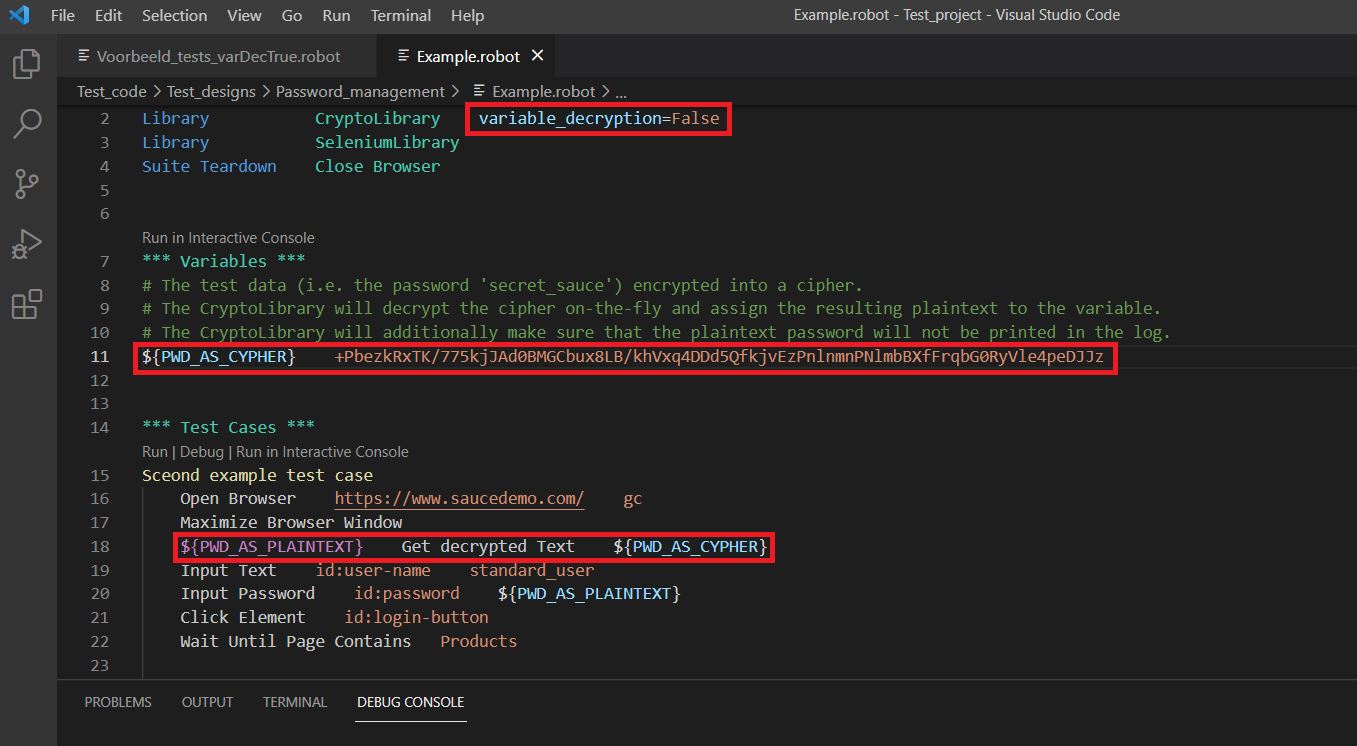
Library CryptoLibrary variable_decryption=True
This will then look something like this:

We have specified an argument within the import statement. Let’s take a look at it and the two other (optional) arguments that the library accepts when importing it.
When the boolean parameter ‘variable_decryption’ is set to ‘True’, then, when running our test suite file, any ciphertext (that is, any piece of data starting with ‘crypt:’) that will be encountered (within the suite) gets decrypted automatically (i.e. on-the-fly). When the parameter is set to ‘False’ (which is it’s default), we will have to explicitly use the CryptoLibrary’s ‘Get decrypted text’ keyword everywhere in our code where we need a ciphertext to be decrypted. We’ll look at some examples of the latter option later on. Here (for our convenience) we’ll assign value ‘True’ to the parameter.
The password for access to the private key can be provided to the CryptoLibrary as an argument as well:
Library CryptoLibrary variable_decryption=True password=myUnhashedPrivateKeyPassword
However, in our import statement this is not necessary, since we had previously saved our (hashed) password to disk. If no password is provided as import argument, the CryptoLibrary will simply look for a password file in the designated folder and, if found, will use it. As was mentioned before, you can set the folder it should look for through the ‘Set key path’ menu option of the CryptoLibrary CLI tool. The default folder is:
your_Python_root_folder\Lib\site-packages\CryptoLibrary\keys.
If the CryptoLibrary can’t find the file and the password is also not provided in the import statement, the CryptoLibrary will throw an error:

Please note that if you provide the password as an import argument, it will take precedence over a password file. That is, in case you have both, the import argument will be used and the password file will be ignored. In that situation, when you specify an incorrect password as import argument, the following error will occur:

Since the password is incorrect, the CryptoLibrary cannot access the private key and thus spits out this error. It would be nice though if it would tell us the actual, underlying root cause, which is that the password didn’t check out.[3]
Another parameter that can be passed through the import statement is ‘key_path’. Through this parameter we can specify a path to the relevant private key file, overruling the currently set default folder.
As was mentioned before, the CryptoLibrary’s default folder for storing key files is:
your_Python_root_folder\Lib\site-packages\CryptoLibrary\keys
We can change the default folder through the ‘Set key path’ option of the CryptoLibrary CLI tool (see above).
Through the ‘key_path’ argument we can refer the CryptoLibrary to a private key file that is located in a folder different from the currently set (default) folder. This is very useful, since we can thus create multiple key pairs and place them in different folders. We can then proceed and use different public keys to encrypt different pieces of test data. Through the ‘key_path’ argument in the import statements of our test suites, we can point the CryptoLibrary to the proper private key files that are needed for decryption.
The path that we specify as a value to this argument can either be an absolute path or can be a path relative to the file ‘cryptoutility.py’. The latter is located at:
your_Python_root_folder\Lib\site-packages\CryptoLibrary\utils
The importing of the library was the last of our preparatory steps and we are now ready to rumble!
Thus, let’s create the following test suite file:
(Please note that if you click the image, the sample test suite file will be downloaded onto your device as a .robot text file!)
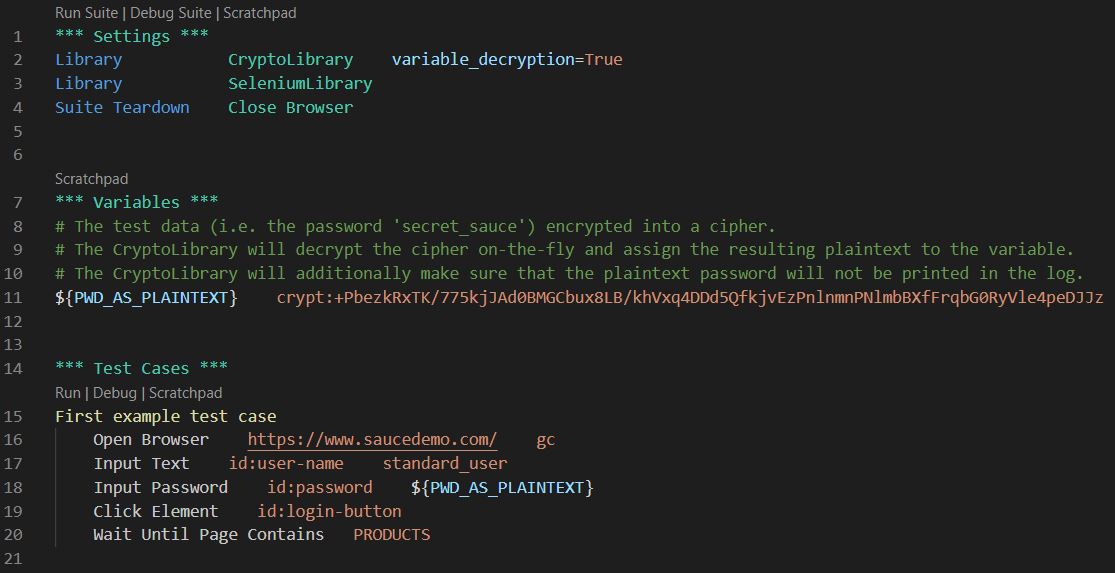
Further note that the test cases contained therein are merely meant as samples, to demonstrate the utilization of the CryptoLibrary. As such they are, naturally, simplistic and not well designed. For instance, normally you should obviously not include low-level, technical steps in your test cases.
Having said that, let’s break down the test suite file.
At the very beginning of the test suite file we see the ‘Settings’ section. It imports a couple of test libraries and defines a simple suite teardown.
Next we have a ‘Variables’ section that declares and assigns exactly one variable: ${PWD_AS_PLAINTEXT}.
Seemingly in contrast to the variable’s name, what is being assigned here is the encrypted (i.e. ciphertext) ‘version’ of the password ‘secret_sauce’.
However, because we have passed variable_decryption=True to the CryptoLibrary upon importing it, the lib will automatically and on-the-fly decrypt the value of any variable (within the scope of our test suite) whose value starts with crypt:. The library will then proceed to re-assign the resulting plaintext value to that variable.
Consequently, when we use the variable name in the test cases below, it will always hold the original, unencrypted test data. Hence the name of the variable is: ‘PWD_AS_PLAINTEXT’.
I will not go into how the library does all of this. If anyone is interested in that, they can walk though the lib’s code (it’s very readable).
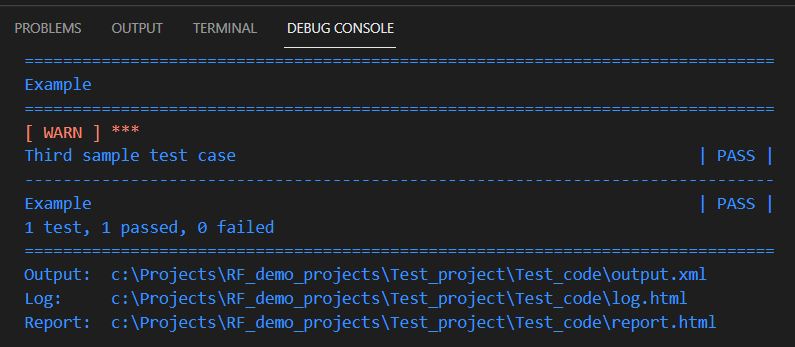
I have created a simplistic test case to demonstrate the effect of all of our preparations above.
The test case uses the SeleniumLibrary to open a browser and load the saucedemo home page. Next, it fills out and submits the log-in form that is on that home page. Finally, it checks that we subsequently land on the proper page by validating that the text ‘PRODUCTS’ can be found. So when running the test case, we will encounter the following two pages:
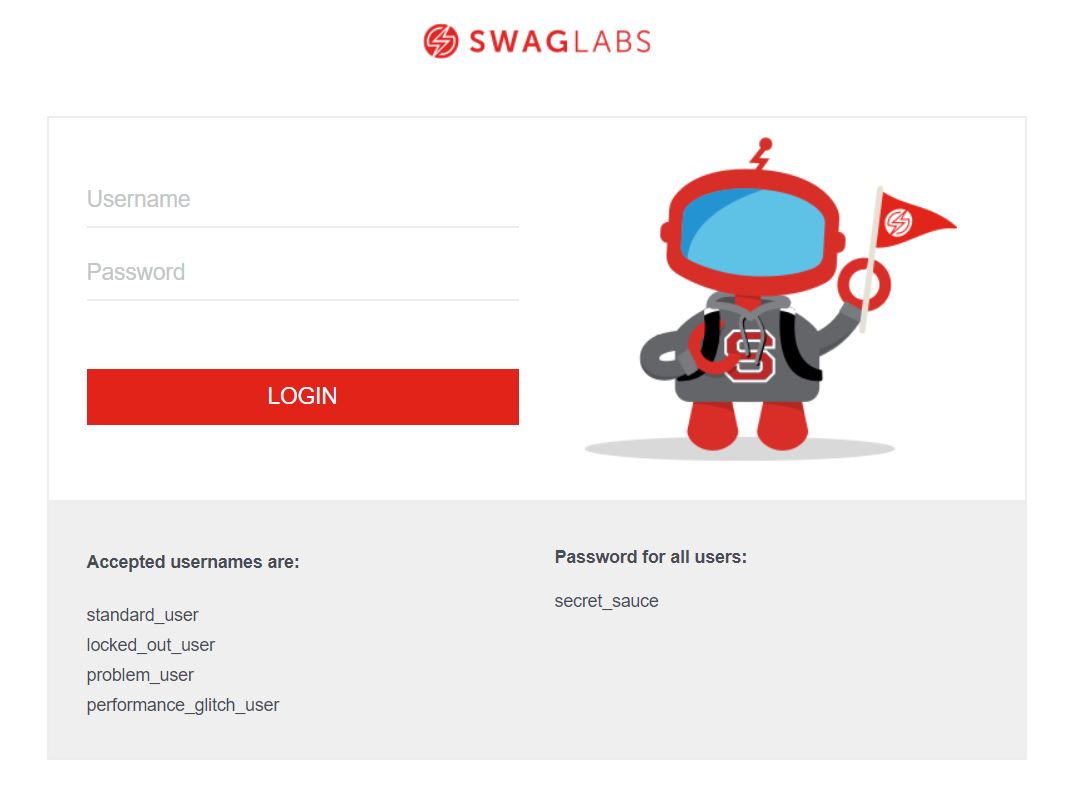
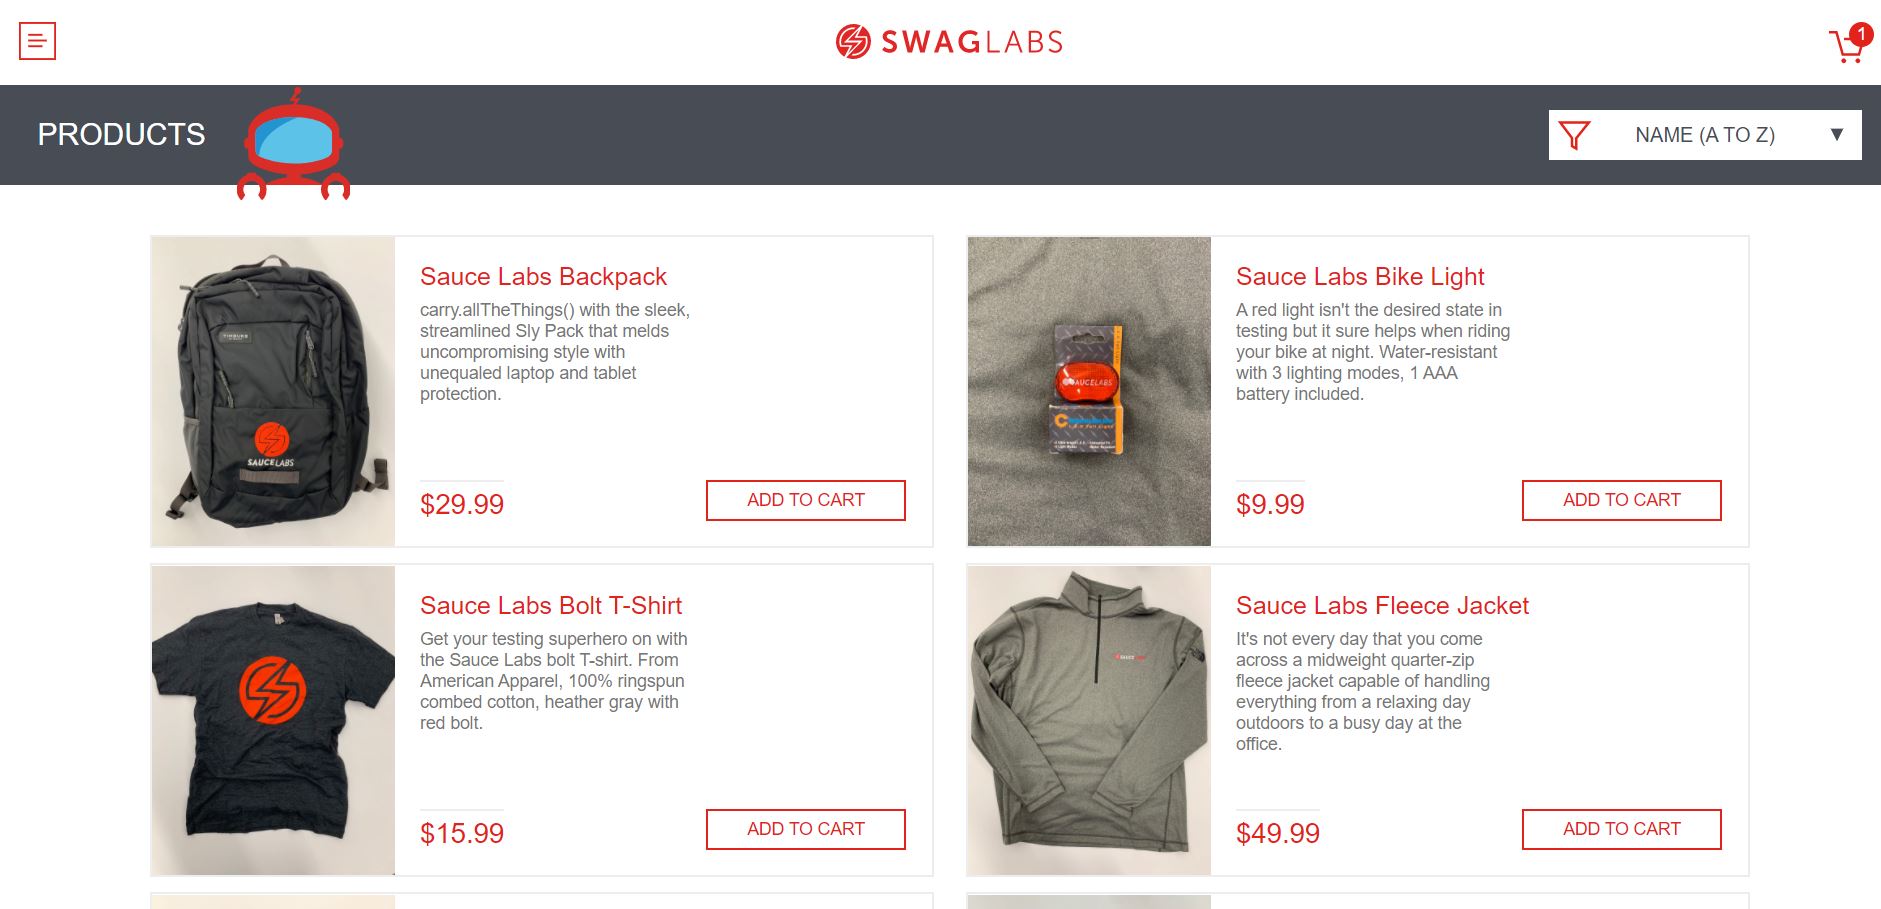
Naturally, we are solely interested in the line of code that employs our password variable:
Input Password id:password ${PWD_AS_PLAINTEXT}
As was explained before, when that line of code is executed, the plaintext ‘secret_sauce’ will be entered and not the ciphertext. So let’s run our sample test case and see what will happen.
Play the video to see our sample test case run.
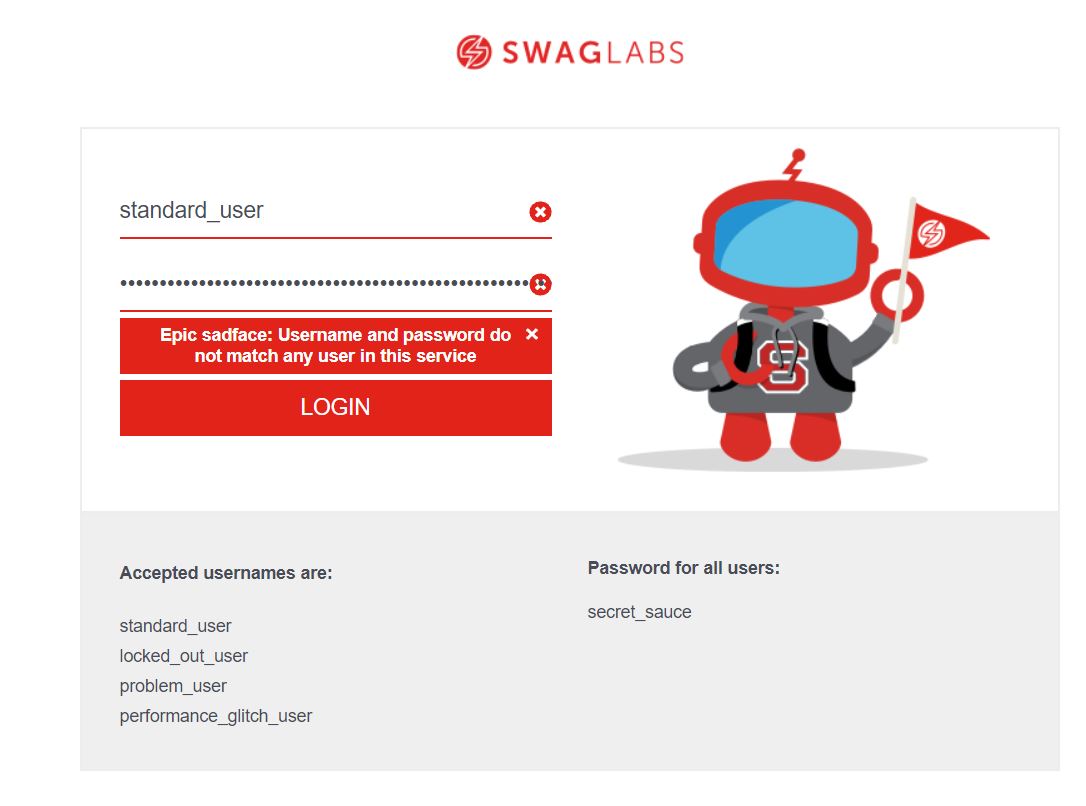
Now, what if we were to set ‘variable_decription’ to ‘False’ or remove that import argument altogether? Well, then the CryptoLibrary would no longer automatically and on-the-fly decrypt all variable values that start with ‘crypt:’. Consequently, if we were to run the same test case again, then the cipher would be entered into the password field and the login (and thus test case) would fail.

We would then have to use the ‘Decrypt text’ keyword everywhere and every time a decryption is required.
That would look something like the following:
What has changed?
Well, our ‘variable_decryption’ import argument has been set to ‘False’.
Further, our variable at line 11 has been renamed to reflect the fact that a cypher will be assigned to it. That is, the CryptoLibrary will no longer automatically (i.e. on-the-fly) decrypt our variable. Note that the cypher itself no longer sports the ‘crypt:’ prefix.
Finally, line 18 had been added to our test case: it decrypts the cypher and assigns the resulting plaintext password to the ${PWD_AS_PLAINTEXT} variable.
Please note: when ‘variable_decryption’ is set to ‘False’, you can, but don’t have to remove the ‘crypt:’ prefixes. That is not required for the CryptoLibrary keywords to work, because any prefix will simply be ignored by them. A possible advantage of not removing the prefixes would be that you don’t have to change all of your variables when you toggle ‘variable_decryption’ from ‘True’ to ‘False’ or vice versa.
So, thanks to the CryptoLibrary we can simply add our password to our test code, without anybody being able to obtain and abuse that password. And we do not have to come up with all sorts of inelegant work-arounds to protect our sensitive data.
But the library does even more for us. Let’s take a closer look at that in the following sections.
Another artifact that might compromise security is the Robot Framework log file.
Typically, when we call a keyword, then the log file entry for that call will also show all of the arguments passed. For instance, when we employ the ‘Input Text’ keyword to write a text value to an edit field of a web form, than the log file will print that text value as well. Anyone having access to the log file will be able to retrieve that value.

Luckily, the CryptoLibrary will make sure that any value it has decrypted during test execution will not be printed in the log. Rather, the value will be masked through asterisks.

There is a slight catch though. To accomplish the masking of log entries, the CryptoLibrary keeps a list of all the plaintext values it has decrypted from ciphers in the current run. Any value that is on that list, will not be printed in the log. Consequently, when we create a new variable in our test suite and assign to it a (plaintext) value that is on that list (i.e. a value that is identical to a value on that list), it, too, will not be printed in the log. Even though technically speaking it has never been decrypted from a cipher.
So, if we were to have “world” somewhere decrypted from a cipher and thereafter have the following call in the same test suite:
Log Hello, world! level=WARN
then when that line of code were executed we would see the following in our log:
[WARN] Hello, ***!"
So even though we simply try to log a piece of plain text with no apparent relation to a cipher, the masking is still applied.
Ciphers have to be assigned to a variable in order for them to get decrypted. So, if we were to write the following:

then the cipher will not be decrypted.
Consequently, we always have to assign a cipher to a variable, either in the variables sections or through keywords such as the ‘Set Variable’ keyword or the ‘Get Decrypted Text’ keyword.
As we have seen, any piece of test data that has been decrypted by the CryptoLibrary will also be masked in the Robot Framework log. Additionally, that data will be masked in the console. For instance, if we were to log our Sauce Demo password, the console would print something like:
However, this does not always work consistently well. For instance, when running he following line of code:
Should Be Equal ${PWD_AS_PLAINTEXT} This is not the password
Then the log output would be something like the following:

But the console output would be something like this:
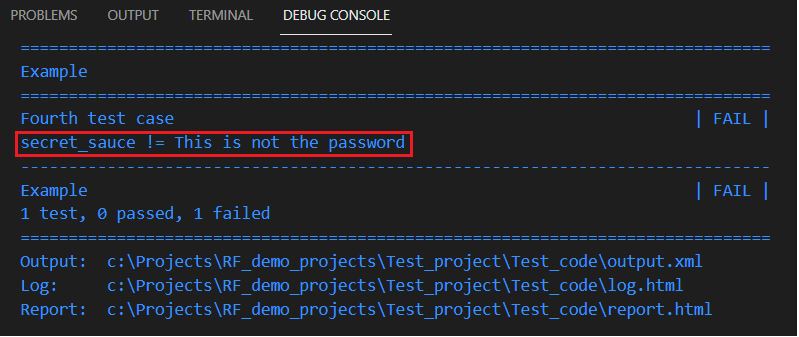
The same happens when other keywords (e.g. ‘Wait until page contains’) fail.
I have created an issue for this on the library’s project page.[4]
The CryptoLibrary adds an important capability to Robot Framework: to secure sensitive and confidential test data.
It’s usage is straightforward and intuitive. The CLI tools that accompany it, add a layer of flexibility and versatility to an already great library.
It is yet another example of the power and enthusiasm of the Robot Framework community and a welcome addition to an already huge ecosystem!
[1] See: https://github.com/Snooz82/robotframework-crypto/issues/15.(back)
[2] Although note that this is just a first step. The password file and private key file can still be grabbed by anyone with file access and could then be used to decrypt our data. Therefore, a better idea would be to store the password in an environment variable during test execution and use that variable when importing the library: Library CryptoLibrary password=%{private_key_password}. (More on importing later in the post.) Then the password is only available during execution and it will also not be logged. Final note: The password is mainly hashed to ensure the AES password is 256 characters long even though the user might enter a ridiculously short password.(back)
[3] See: https://github.com/Snooz82/robotframework-crypto/issues/16.(back)
[4] See: https://github.com/Snooz82/robotframework-crypto/issues/18.(back)
Comments
Please join the discussion: place a comment on this page.
The comment will be immediately visible in this comment section.
Please note a Github account is required to comment.